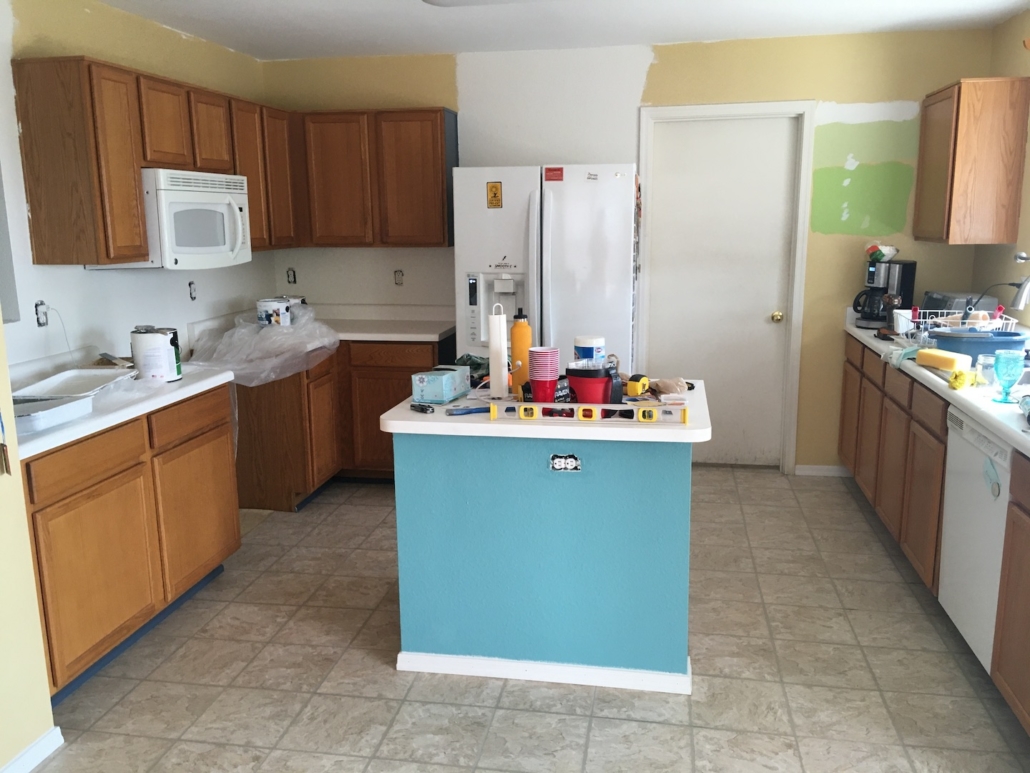
DIY Kitchen Remodel: Adding Cabinet Hardware

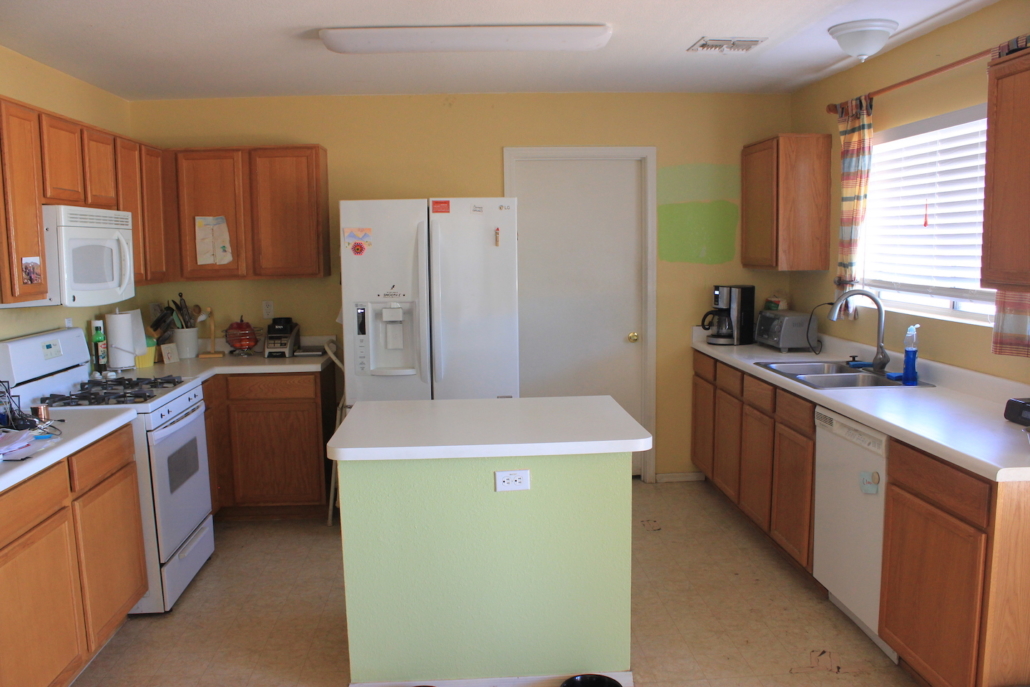
Is anyone still doing quarantine home renovations? Now that this endless spring break has dragged out for the better part of a year, I’m not seeing many people post about projects. We all started out strong but if you are anything like me, you’ve moved on to binge watching all the latest TV shows. It’s possible I’ve watched more TV this year than in my entire life combined.

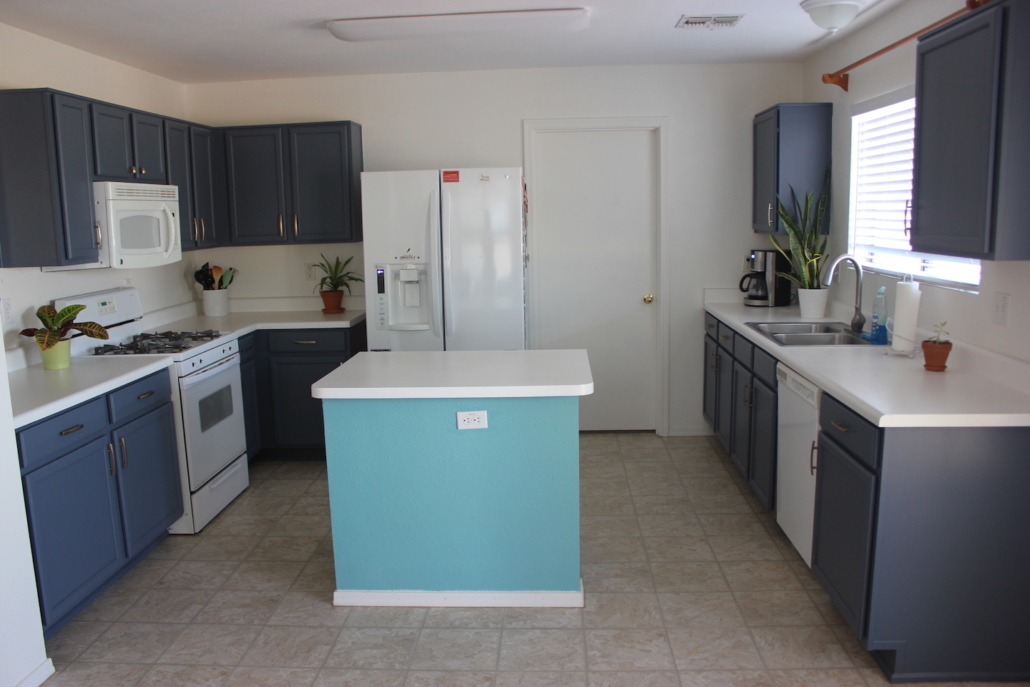
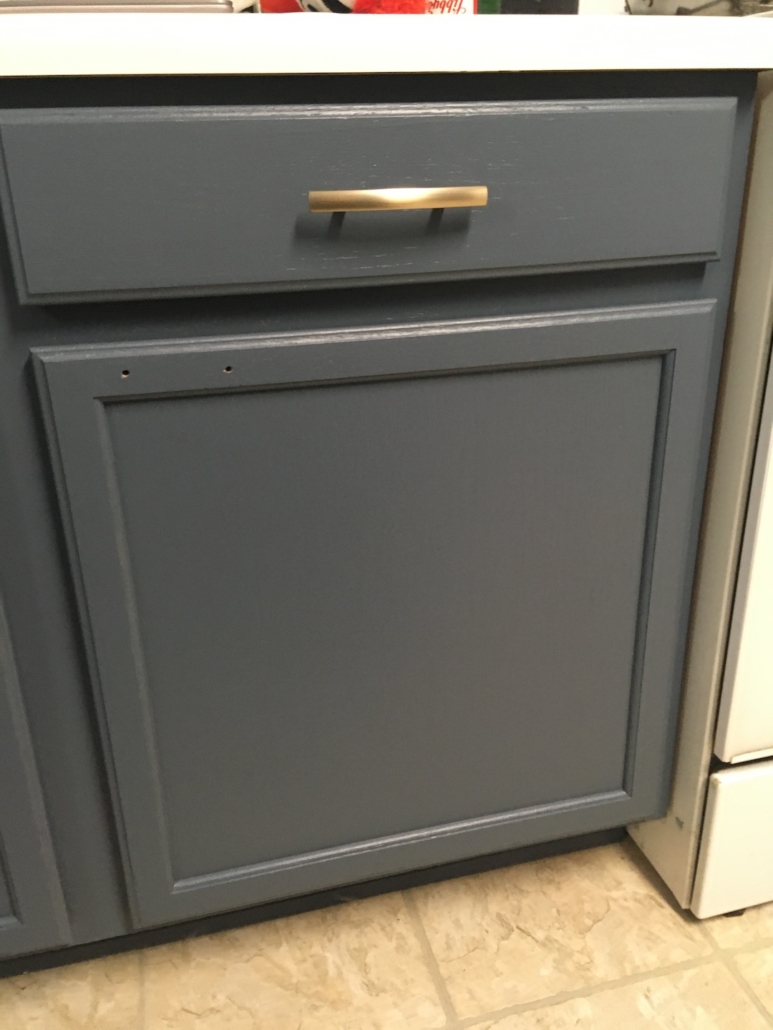
I don’t know that any home I’ve ever lived in has had hardware on the cabinet doors so I didn’t know what I was missing. If you don’t have hardware, should should add some. The two most important things we learned are that you should drill the holes before painting the cabinets and that you should drill the holes with the doors and drawers off. Why is that, you say? Let me explain in seven easy steps.

7 Steps to Adding Cabinet Hardware

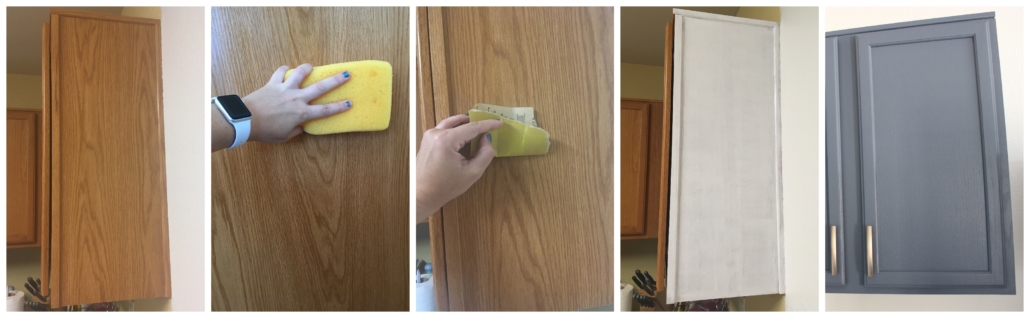
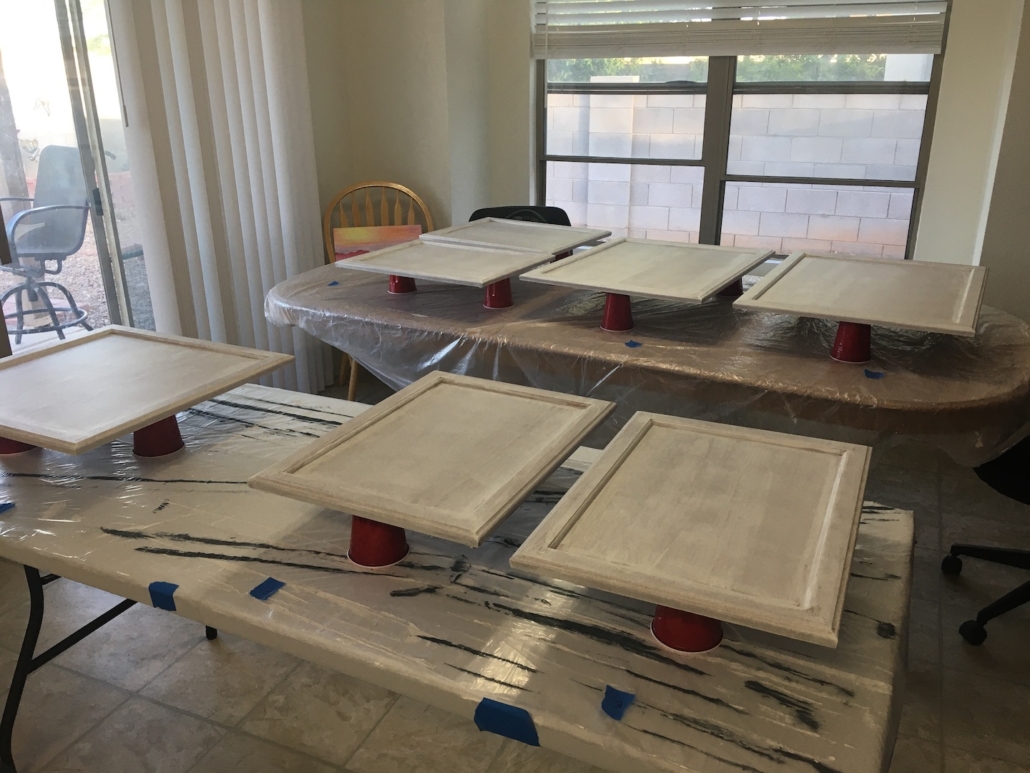
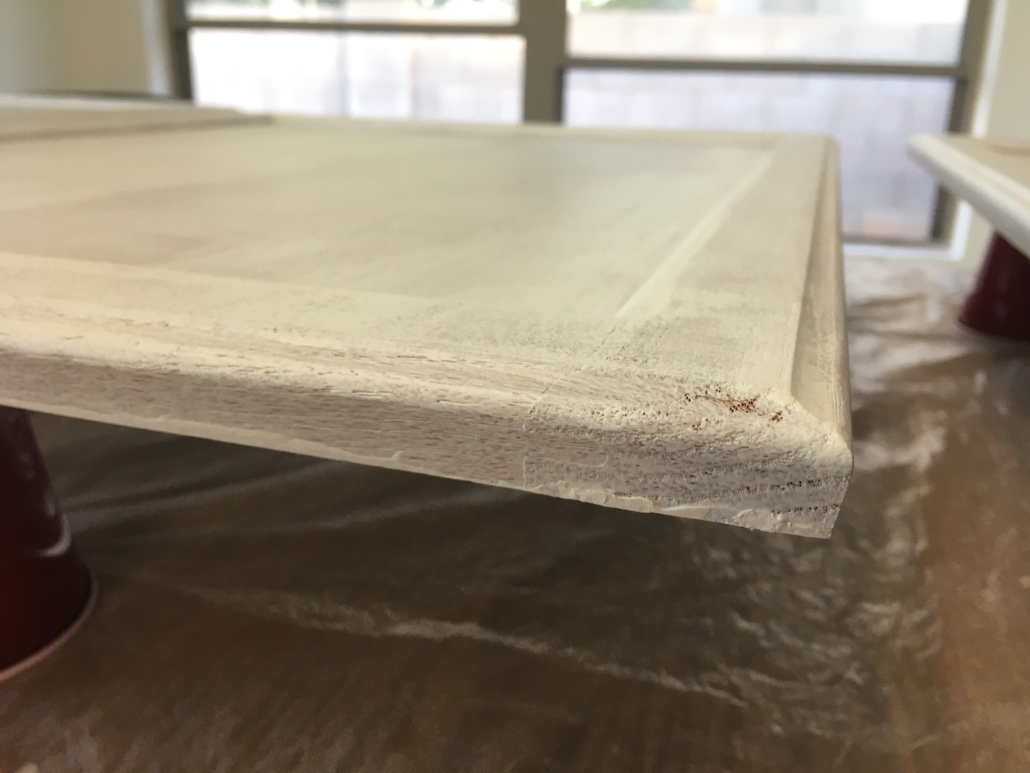
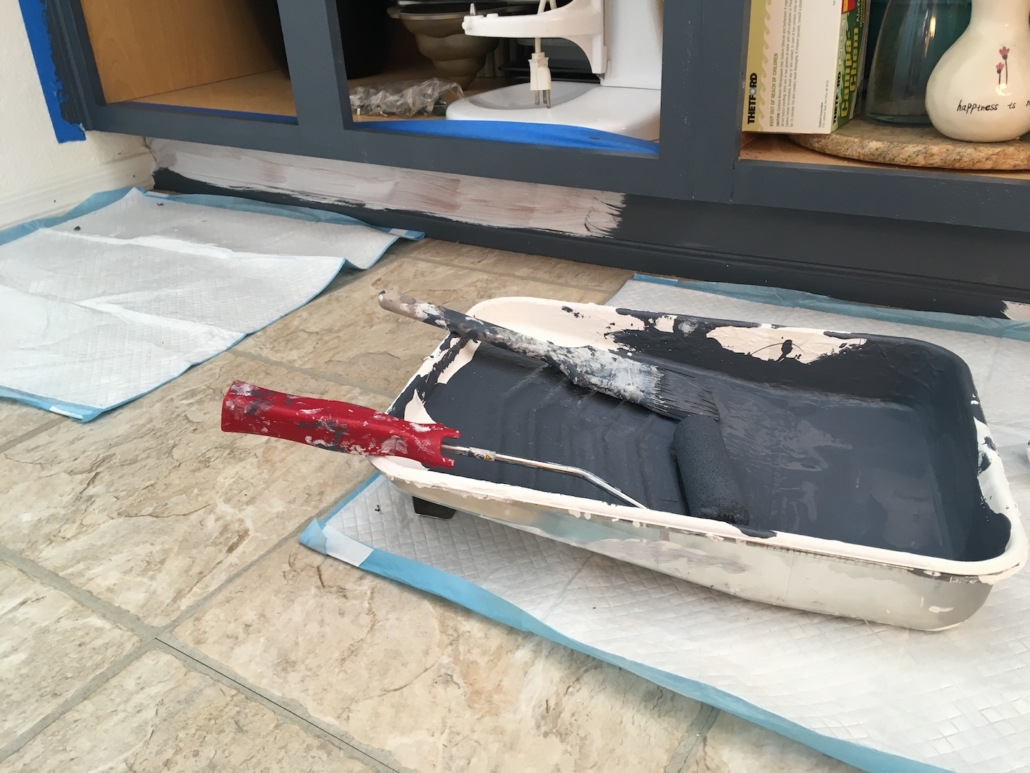
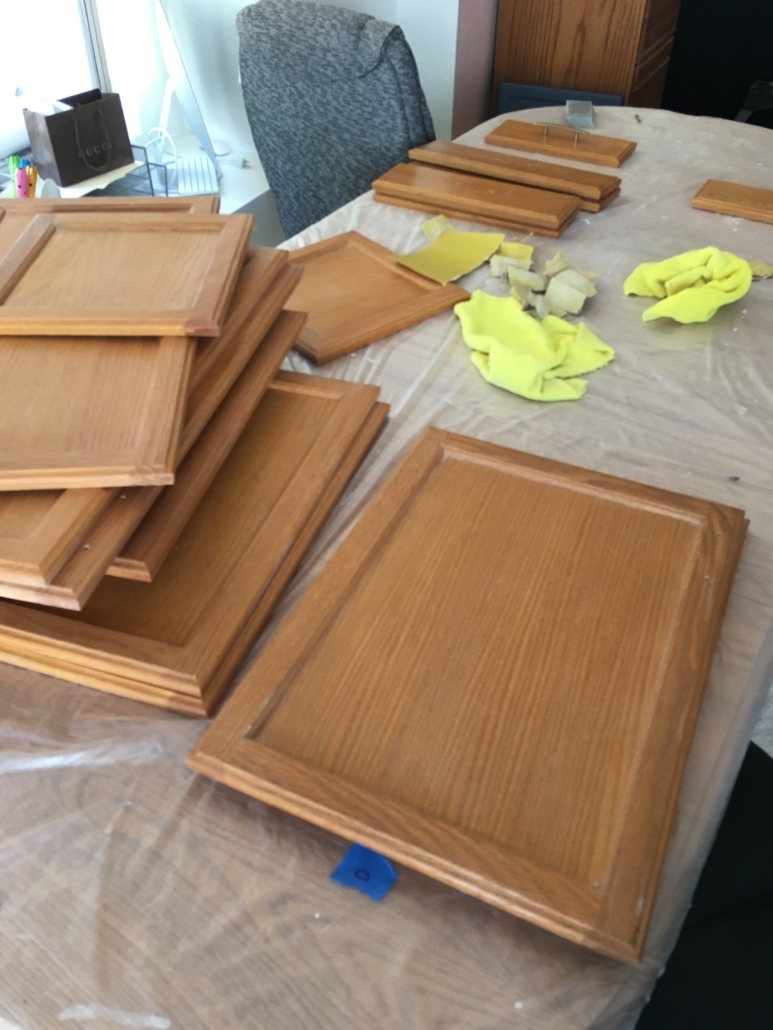
1. If you are adding hardware and painting your cabinet as part of the same project, drill the holes BEFORE you paint. I painted a few cabinets and then we drilled the holes for the hardware. If you work with wood/drill bits regularly this might not be a surprise, but getting the hole started pulled up some of the paint and wood and required touch ups and sanding in some cases.

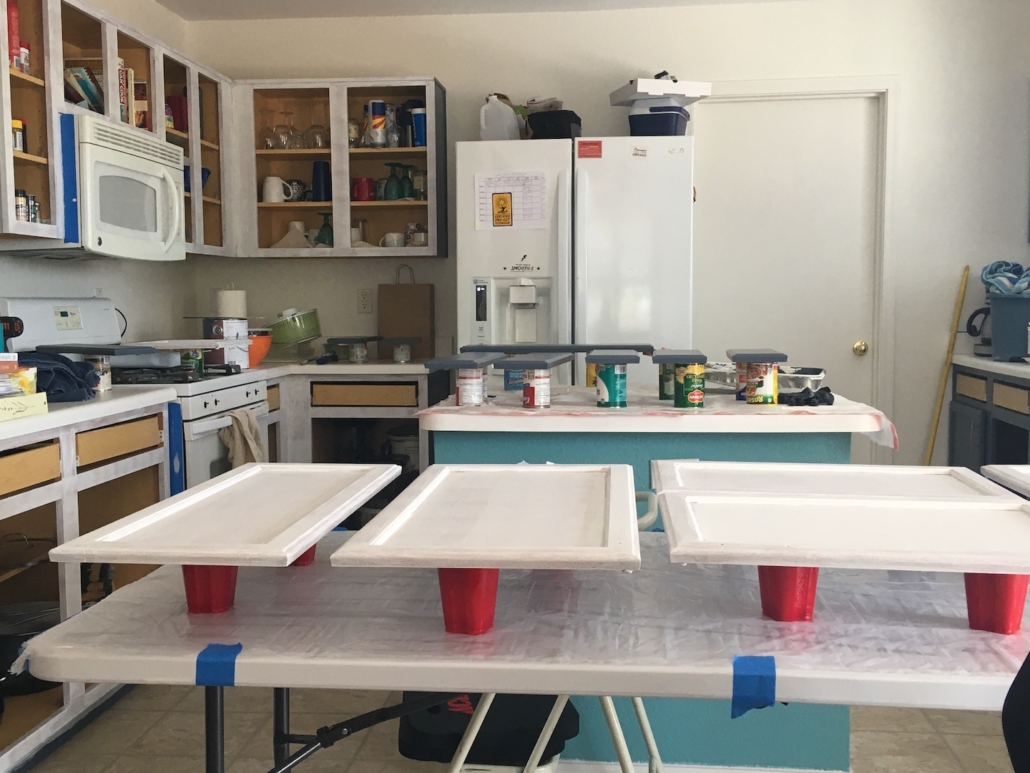
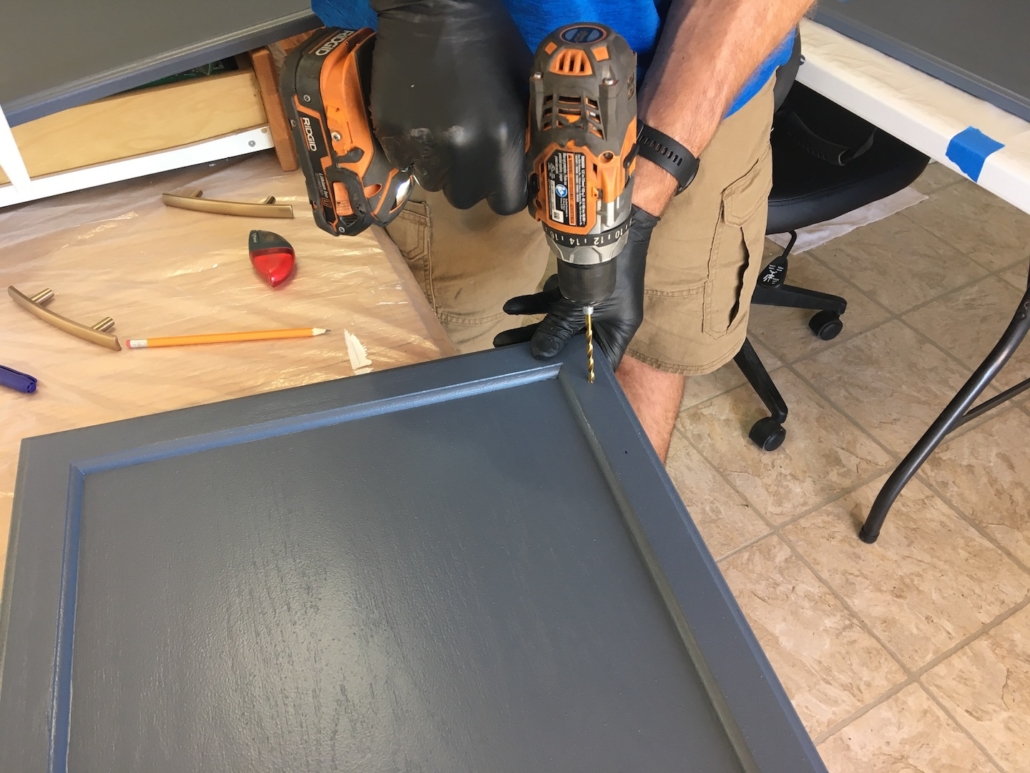
2. Take off the doors and drawer faces. We started this project by drilling the holes with the doors on the cabinet box. While that sounds more efficient, we found it hard to drill a straight hole and had to redo a couple. Fortunately, we didn’t get too far into the project before realizing this was a bad idea.

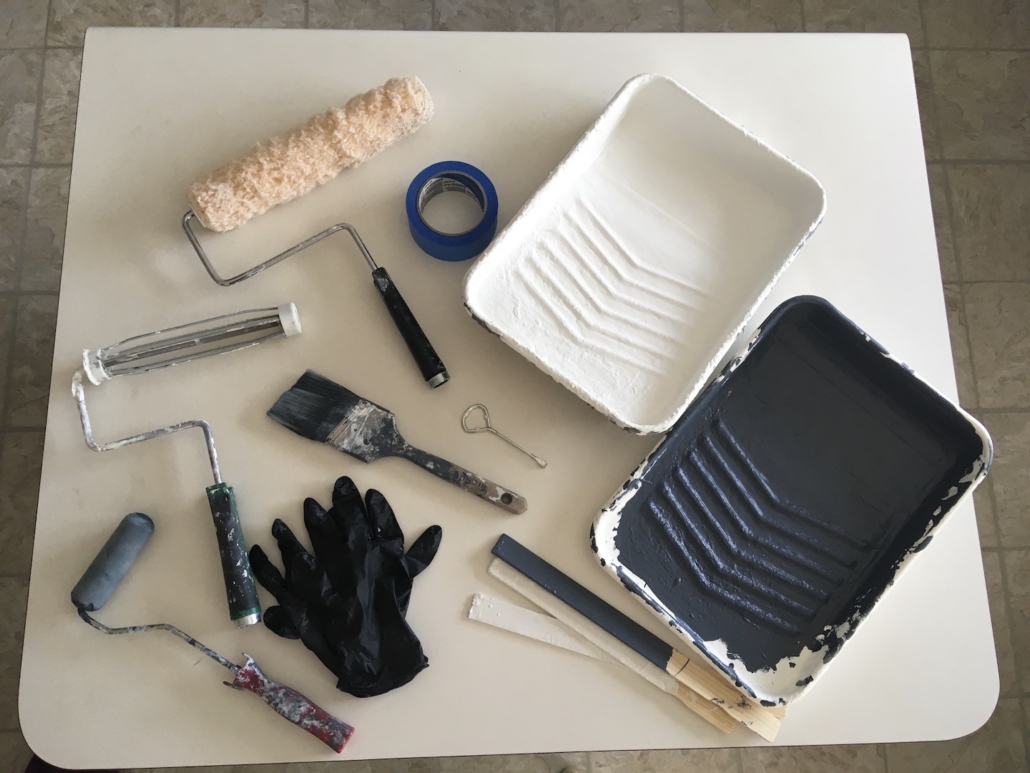
3. Purchase or make your own template for the hardware holes. I purchased a premade template for the cabinet doors and drawer fronts. It seemed like a great idea but I found that the cabinet template didn’t fit my doors. The drawer front one worked though. I ended up making a template out of a cereal box and it worked perfectly.

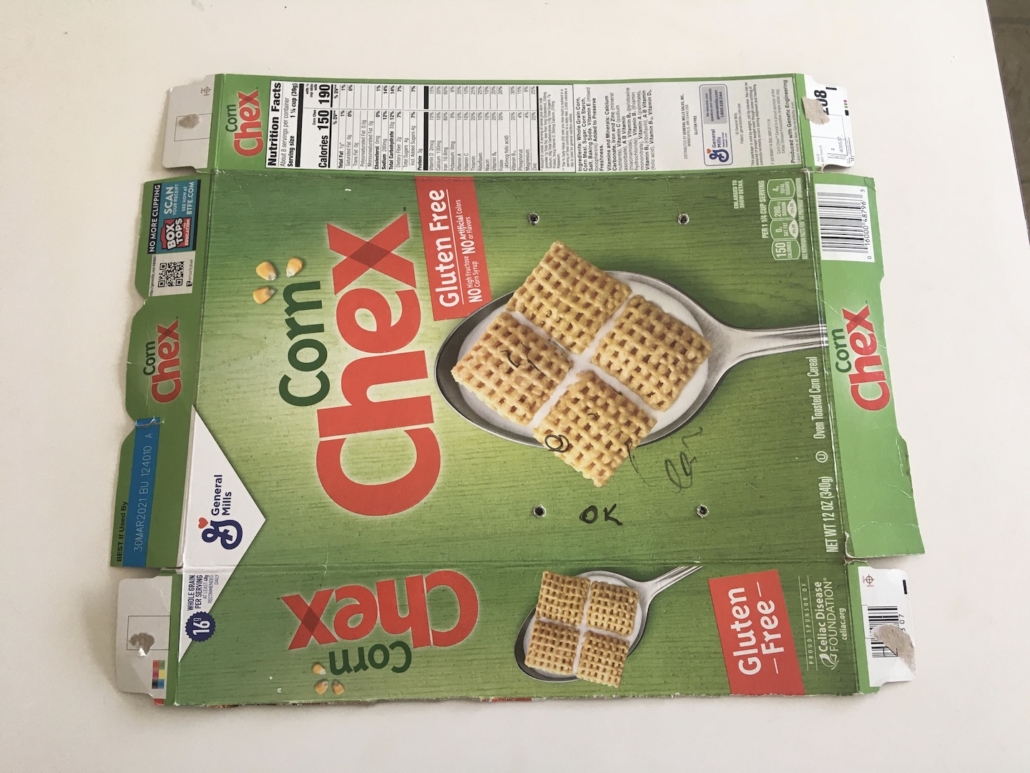
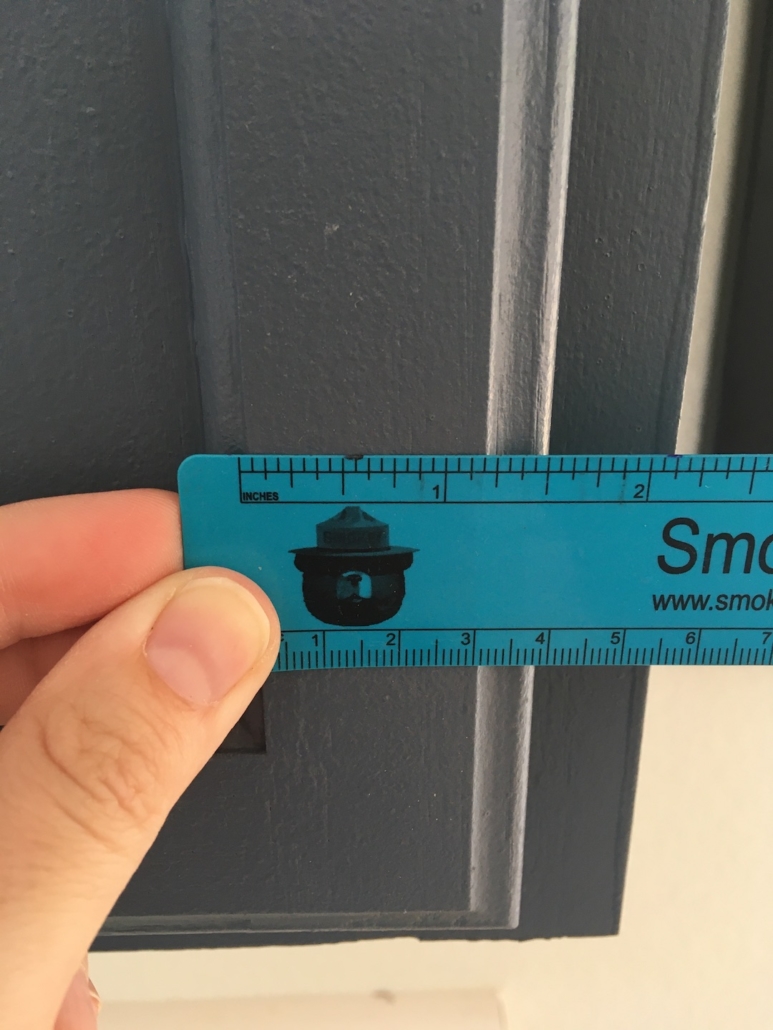
I used a ruler to measure the distances and transferred that onto the box corners. I used a pen to poke holes wide enough to use with a sharpie. If your cabinet doors face different directions be sure to make templates for all sides needed.

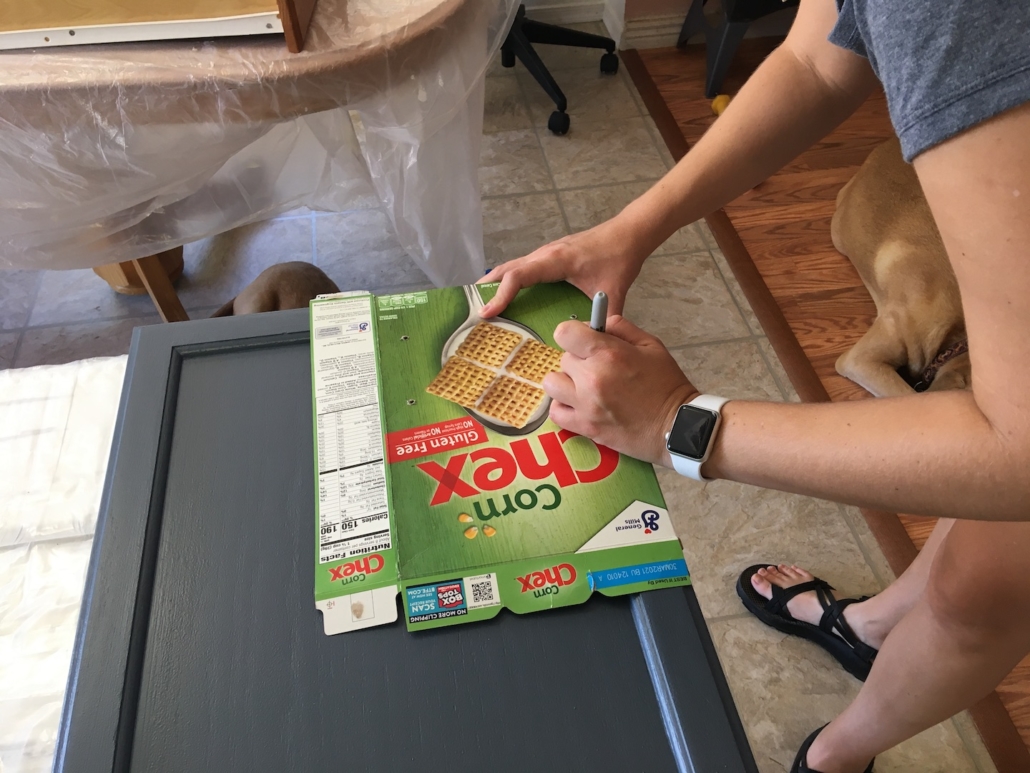
4. Add dots for where to drill. For the cabinet doors we used my cereal box template. I just lined it up over the corner and used a sharpie to notate where to drill the holes. The box flaps helped keep the template square in the corner so don’t cut them off.

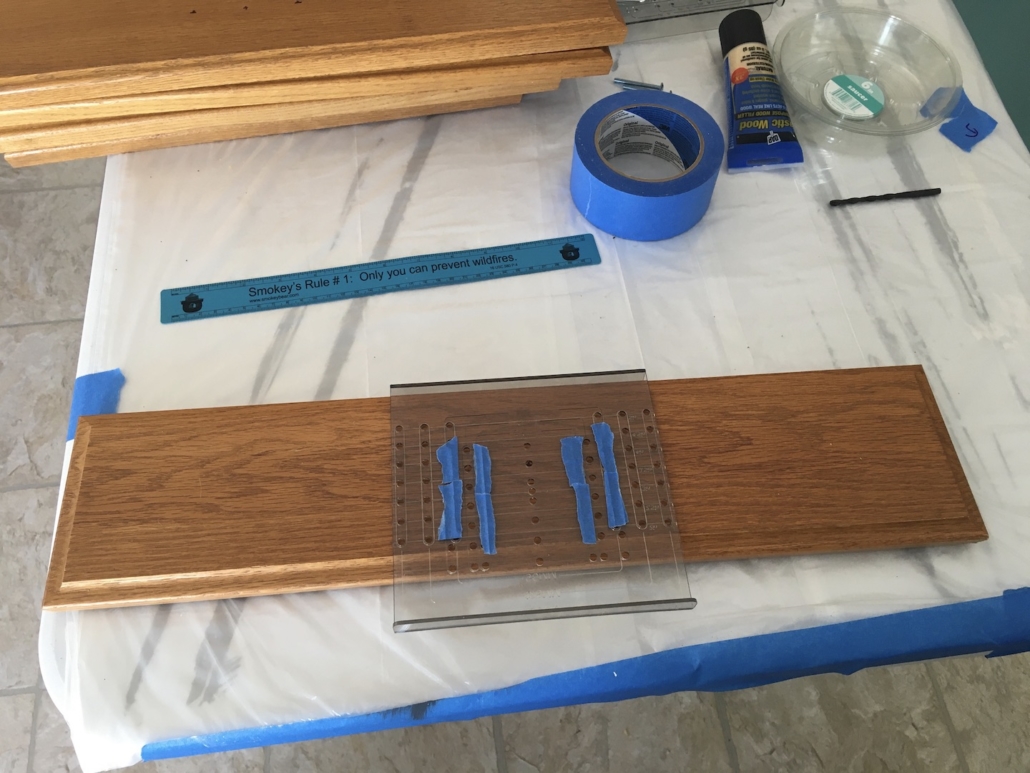
For the drawer faces we used the premade template we purchased. We purchased ours from our local hardware store but they also sell them online. I have no idea how to tell it if will work for your cabinets until you get it home and test it. If you happen to know please chime in in the comments.

We used painters tape to cover the holes we weren’t using to prevent marking the wrong hole.

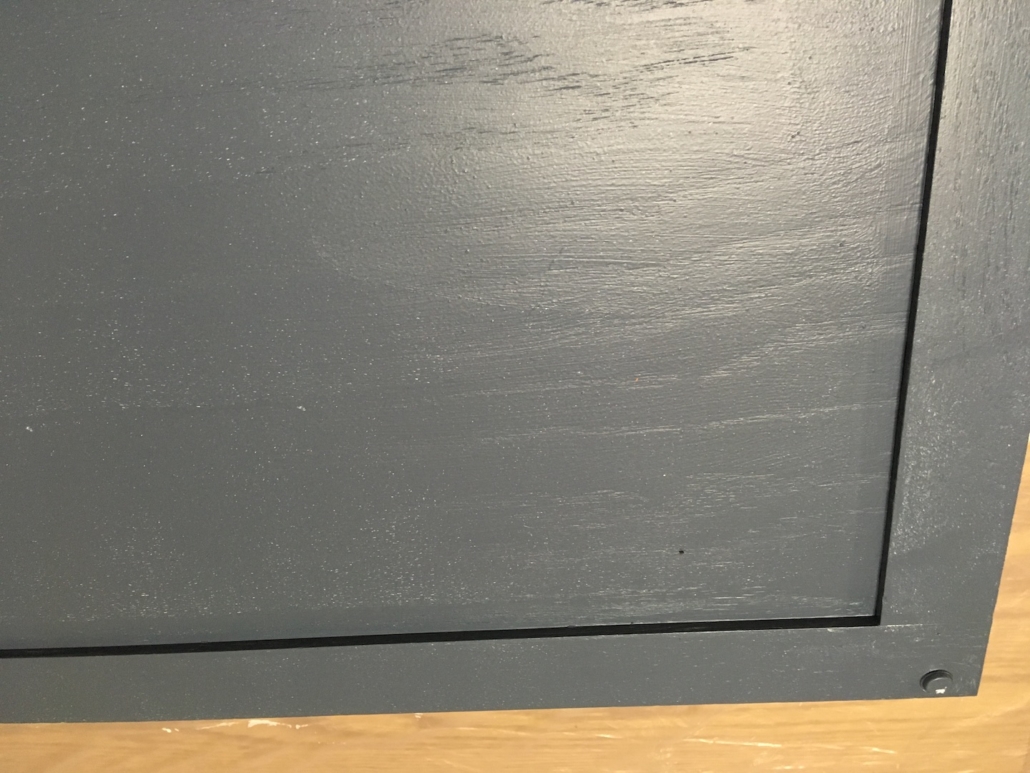
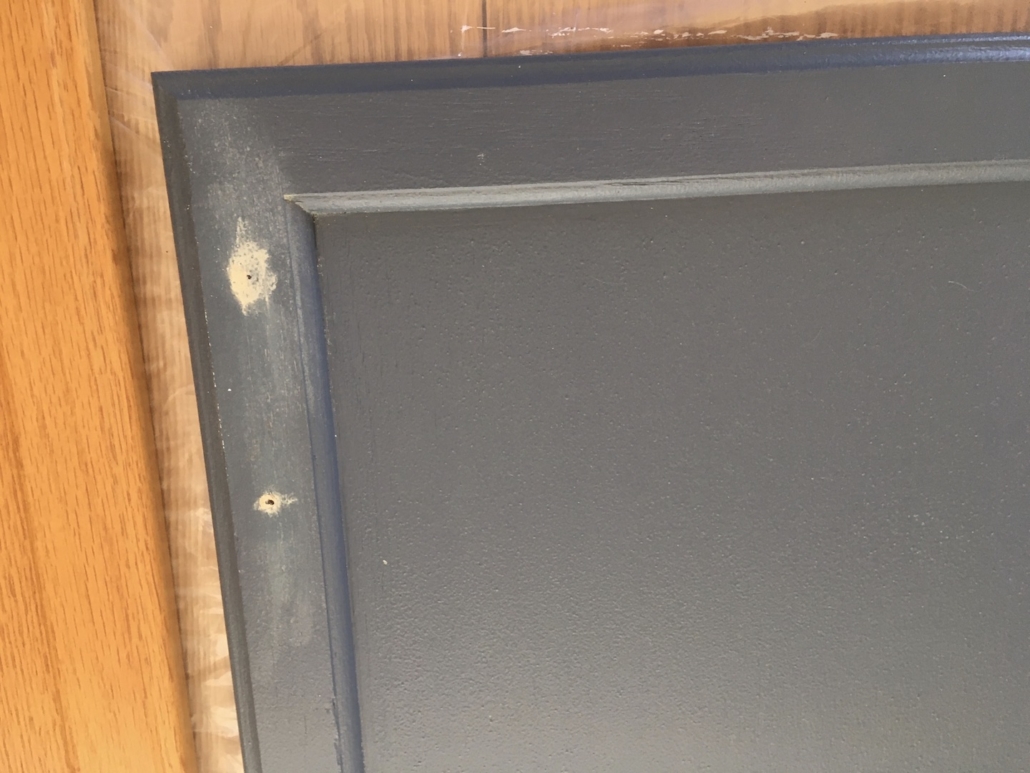
One piece of advise: Since you’ve taken all your cabinet doors off and probably have them in a pile now, visually line the door up with the cabinet it belongs to before placing the holes to make sure you have them in the correct location. I learned this the hard way as evidenced in the picture below.

5. Drill holes. Once the dots are in place you can drill. My job was to add the dots; The Husband drilled. We found that if you drill standing up, so if the doors are on the cabinet, it’s hard to keep the drill bit straight. We were able to make much straighter holes drilling in this fashion. If the hole isn’t straight enough the hardware will not fit. We used a 3/16 drill bit.

6. Screw in the hardware. For the majority of our doors/drawers, we drilled all the holes before painting but we did test the hardware to make sure it fit properly. Once or twice we realized my holes were off and had to fill in the holes with wood putty, wait for it to dry, and then start over. It’s not the end of the world but it’s a tad annoying. If you aren’t painting, you are almost done!

7. Replace the doors and drawer fronts. This is the most exciting part of the project because it’s when everything starts to come together.

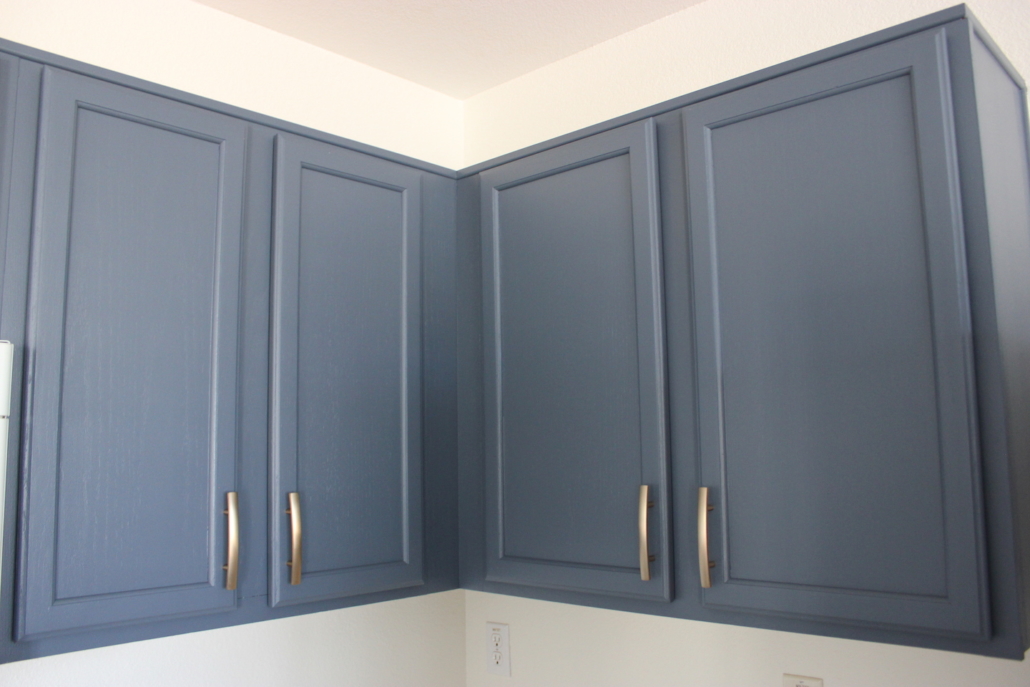
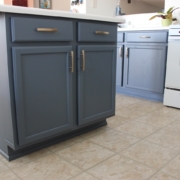
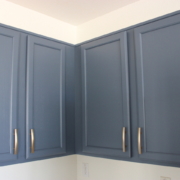
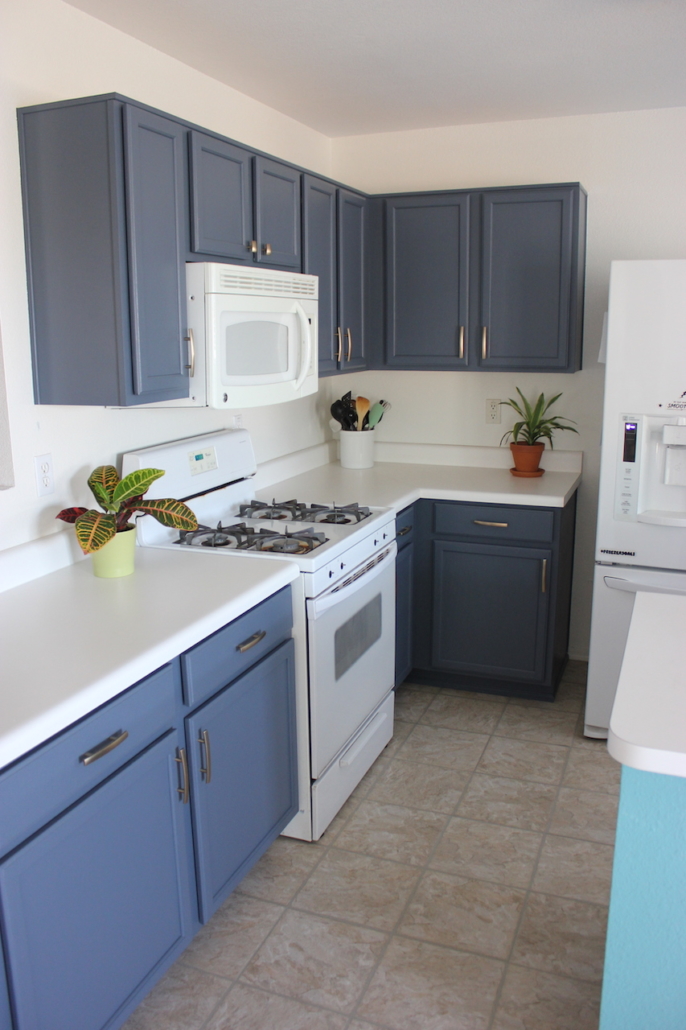
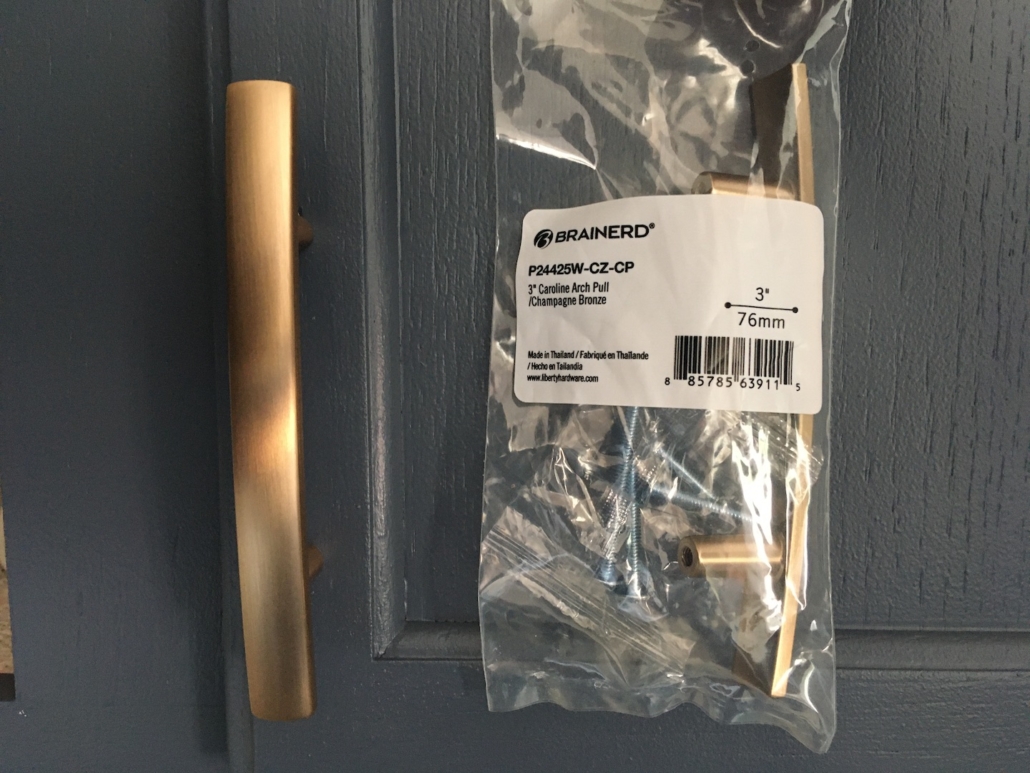
We opted for these Caroline Arch Pull handles in champagne bronze. They caught our eye on a display wall but when I saw the name I knew it was meant to be.

So that’s it! Pretty easy, huh?

Budget

The biggest expense with this project is the hardware. We already had a drill but we did have to buy a drill bit. Overall, we spent $185 for a drill bit, hardware, and the premade templates.

Handle pulls are more expensive than knobs so if you’re looking to save some dough you may consider all or some knobs. We were planning to do pulls on the bottom cabinets and knobs on the top but once we got them home we decided we liked the pulls better.

The BEST Chicken Noodle Soup

I realize this is not a food blog but I need to document this recipe so I don’t lose it. A year or so ago I wanted chicken noodle soup and started with The Girl Who Are Everything’s Homemade Chicken Noodle Soup recipe. I’m gluten free so I just used the soup portion and made it fit to my dietary needs. I was a bit sidetracked while making the soup and did a few things weirdly but it came out AMAZING.

When you read my instructions you’re going to be like, huh? Trust the process. I’ve made the soup numerous times since and tried a bunch of different ways, including as the original recipe is written, and my messed up recipe is the best.

Recipe:

  • 2 tablespoons butter (I use Earth Balance)
  • 3/4 cup chopped onion
  • 3/4 cup chopped celery
  • 3/4 cup sliced carrots
  • 2 cloves garlic (I use a garlic press but you could also chop it)
  • 4 cups Swanson Chicken Broth (32oz which is one box)
  • 4 cups Swanson Chicken Stock (32oz which is one box)
  • 1 cup water
  • 1/4 teaspoon dried basil
  • 1/4 teaspoon dried oregano
  • Salt and pepper to taste
  • Noodles
  • Shredded chicken

Instructions:

  1. Chop the onion, celery and carrots. Add vegetables to a stock pot along with the butter. Cook over medium heat until vegetables soften, about 5 minutes. Add garlic, stir, and cook another minute. Add seasonings and stir again. (I do not add salt to this recipe. The chicken broth and stock are salty enough for me but it may be different for you.)
  2. Here’s where it starts to get weird. Add the chicken broth and stock and turn the heat to high. DO NOT ADD THE WATER. Cook on high for about 30 minutes. You want the liquid to boil down. (I often double this recipe and cook for 60 minutes instead of 30.)
  3. Once your broth is reduced, add water to soup mixture. You should still be on high heat. In a separate pot start boiling water for your noodles. Add noodles to water pot and cook for desired length. Once the noodles are done, turn off the heat on both pots and drain noodles.
  4. Add the desired amount of chicken and noodles to your soup mixture and eat!

Notes:

  • I either buy a rotisserie chicken to shred or cook a chicken breast in the crock pot. Add a frozen chicken breast to a crock pot and turn it on high. In about an hour the chicken should be cooked and ready to be shredded. Both options work great.
  • This recipe works with gluten or gluten-free noodles. I use gluten free elbow noodles but you can use anything you like.
  • Do not add the water until after the soup cooks down. The first time I made the original recipe, I don’t think I realized the box is 4 cups and the recipe called for 9 cups. I added 2 boxes but that’s only 8 cups. I then forgot to turn the soup down once it started boiling and forgot about it for a bit. I added the water after the fact to equal 9 cups of liquid overall. I have since made this by adding the water at the same time as the stock/broth but the flavor is not as rich in the end.
  • I’ve tried different broth and stock brands but the combination of these two made by Swanson is our favorite. I don’t know how I ended up with this combo originally but I’m pretty sure it was a happy accident.

Being that this is not a food blog, I have no idea how to make this print like a recipe. My apologies. Feel free to copy the text and print to a piece of paper.

If you end up making this let me know what you think. I hope you love it as much as my family does!

DIY Kitchen Remodel: Painting Cabinets

I never had an issue with our oak cabinets until a friend invited me to a kitchen remodel Facebook group. I was wanting to paint our kitchen green and was having trouble finding the color I wanted. So that’s where this entire project started. Trying to find the perfect shade of green paint for the walls. After seeing tons of before and after pictures of painted cabinets, particularly of circa 2000 oak, I was sold. At that moment the project transformed from green paint to an entire kitchen remodel.

The first big decision was deciding whether to use normal paint on the cabinets or chalk paint. Chalk paint seems to be all the rage and the claim is that you don’t need to sand or primer your cabinets. While that sounds nice, I decided to go with normal paint. Having never used chalk paint, I was worried about using it on such a big project right out of the gate. I am going to use it in my bathroom so I’ll report back later which I prefer.

5 Steps to Painting Cabinets

1. The first step is to clean your cabinets really well. While there are cabinet cleaning products, I am not a big chemical fan so I opted for soap and water and it worked great. This sponge is amazing! And some blue Dawn soap.

I’m not sure how often you clean the top of your cabinets but that’s not something I do on the regular. Honestly, it’s not even something I think to clean. Out of sight out of mind, I guess? Boy was I surprised when I realized how much grease and dust is up there and how hard it is to clean. If you find yourself in the same situation, this post is helpful. I used vinegar, baking soda and a credit card to get the majority of the gunk off and then followed up with blue Dawn and a sponge.

2. Once the cabinets are clean and dry you want to lightly sand them. We used 220 grit sandpaper per the recommendation of a cabinet guy refinishing a friends’ cabinets. I also bought a foam sanding block thing to make the corners easy. I honestly don’t know what a “light” sanding means and have no idea if we sanded enough. Basically, we roughed up the surface but did not take off the first layer. Make sure you sand in the direction of the wood grain, that I do know! After sanding I wiped the cabinet down again to get rid of the dust. (Be sure to wear a mask while sanding.)


3. The next step is to primer the cabinets. As with most of the steps in the kitchen remodel process, there are 1,000 options and everyone has their own opinion of what’s best. I struggled with analysis paralysis every step of the way on this project. Ultimately, I decided to use Benjamin Moore STIX Waterborne Bonding Primer which we purchased at Ace Hardware. Our cabinet boxes have laminate on the ends and supposedly you should use a bonding primer. That’s what the internet told me. Don’t worry about the primer looking perfect. The cabinet paint will cover any imperfections.

The most annoying part of painting cabinets is painting the doors. We took ours off so I didn’t have to paint around the hinges but it took twice as long you have to wait for the side to dry before flipping it over. I thought I would be able to fit all the doors on these two tables at once. Nope! Turns out they’re much bigger than I realized so I had to do them in batches.

We used a brush for the inside corner edges and a small mini foam roller for everything else.

4. Once the primer is dry it’s time for the first layer of color. This is such an exciting step because you get to see the kitchen start to come together. For the cabinet color we went with Benjamin Moore Evening Dove. We used their Regal Select paint in a pearl finish.

The first coat doesn’t look that great but that was fixed with the second. Once the first coat is dry add the second. I noticed small bubbles on some of my doors. The paint is self leveling and most of them go away as the paint settles or whatever it does as time goes on. Don’t worry too much about what it looks like initially. It gets better as it dries.

Cabinet door after the first coat of color

5. The most exiting part of the project is putting the kitchen back to together! Our cabinets didn’t have hardware so we added it (I’ll write up a post about how to do that next) and put the doors back on.

Tips for Painting Cabinets

We opted to hand paint the cabinets versus using a paint sprayer. Being that we live in AZ and completed this project in June, painting cabinet doors in the garage was out of the question. If we were to do this again, and it wasn’t a quarantine project, I might try the paint sprayer route in the garage not in the summer. Here’s what we learned.

  • Buy a box of disposable gloves. Painting cabinets requires so much work – cleaning, sanding, priming, two coats of paint, cleaning brushes and rollers. Your hands will thank you. I reused the gloves as many time as I could but did use quite a few pairs over the course of the project.
  • If you are adding hardware, drill the holes before painting. Fortunately we caught this mistake before getting too far into the project but did have to touch up a few doors.
  • If you take your doors off to paint, you need to rest them on something. I didn’t do this at first and quickly learned why. Any excess paint pools at the point where the door touches the table and drys that way. Fortunately, we learned this on the primer coat and were able to sand it down and move on.
  • Test. Remove.
Dried primer pooled on the bottom of the cabinet door.
  • Cans do a better job of holding up doors than plastic cups.
    • Cans are solid and didn’t fall over if the table was bumped.
    • While the plastic cups got the job done, they were very unstable and kept sticking to the doors. (I realize the cups are upside down which increases the instability. This is because there is a small depression on the small end of the cup that was leaving a circle in the paint. The larger opening wasn’t doing that so I had to use them upside down.)
  • Since this project happened in bursts (before and after work), I had to do a lot of brush and roller cleaning. I used an old dish drainer for drying and storage of the brushes and rollers. It kept my mess mostly contained so I had a somewhat functional kitchen for cooking.
  • Puppy pads make for a great moveable floor cover. We also recently adopted a puppy and had some on hand so there’s that.

Before & After

Before
After!

We are so happy with the result! The kitchen is so much brighter and it’s no longer an eye sore. We were/are planning to add a backsplash but are taking a break for now. We were naive to think we could get this far, and add backslash, within a week. We’re not sure the accent wall will stay that color but once I find curtains, a backsplash or wall art I will finalize the color.

Budget

Painting kitchen cabinets is actually a really inexpensive way to update your kitchen. All you need is sand paper, primer, paint, paint brushes, time and patience. We spent $150 total on paint and supplies (this does not include cabinet hardware). We purchased one gallon of primer (and have a ton left) and one gallon of cabinet paint (and used almost all of it).

If you have questions on painting cabinets or want to share your experience feel free to do so!

DIY Kitchen Remodel: Installing Luxury Vinyl Tile

Installing New Flooring

Before we could lay the new tile we had to fix the under floor. If you haven’t read that post it can be found here. We have wood flooring in the rest of our house and wanted to keep a tile look in the kitchen. Having tile installed was out of the budget and attempting it ourselves seemed like a really bad idea. We started by looking at peel and stick vinyl floor tiles but couldn’t find a pattern that we agreed on. We ended up coming across vinyl plank flooring and found a pattern we both really liked. It was more expense than everything we were looking at, but still much cheaper than real tile.

We went with the TrafficMASTER Luxury Vinyl Tile in Sedona. Online the color looks more yellow than it does in real life. Supposedly this style is being discontinued so we couldn’t buy it in the store but were able to order it online and have it shipped to the store for free.

The style that we chose comes in planks with three tiles per plank. It’s a floating floor so if we decide to redo the floor later down the road it should be easy to pull up. The planks have sticky on the edges and that’s how they stick together.

Overall, we are happy with the way the floor turned out. It looks great and has brightened the kitchen. Working with the sticky was a bit challenging at times and there are a few sections that didn’t glue together properly leaving some noticeable gaps. The picture below is the worst section. The majority of the connections are fine.

We wanted to buy grout to fill in the gaps (we have no idea if we should do this so don’t follow our lead) but haven’t been able to find a color that matches. The downside to the quarantine kitchen remodel bandwagon is that so many items are out of stock everywhere. And if we’re being honest, our old floor had duct tape on it so a few small gaps really aren’t a big deal.

Our biggest frustration with the tile is that of the 13 boxes we ordered, the tiles in 4 boxes all came with broken corners. Of course we didn’t know that until we actually started laying the floor because we had left the flooring in the boxes. You can see in the picture below what the broken tiles looked like. We ended up using these pieces for the edge cuts. We finished the project with four tile strips left. Two broken and two not broken. That is way too close for comfort but I’m glad it worked out. Because of the sticky the pieces can only be installed in one direction which means you end up with a lot of waste. I would highly recommend purchasing the extra 10% recommended.

The hardest part of the install was cutting the tiles for the pantry doorway. Cutting the tiles in general was super easy and one of the main reasons we liked this tile. All you need is a box cutter to score the tile. Then you bend and it breaks apart. We used a T square to keep our lines straight. For the door frame, we started by creating a paper template of the doorway. The tile cuts weren’t coming out right so we just kept measuring and recutting. We went through quite a few pieces of tile but in the end got it right. And when I say we I mean The Husband. This was all him and he did a great job!

When laying flooring with glue you are supposed to roll over it with something heavy to set the glue. We didn’t know this when we started and were really grateful to learn that Home Depot rents tools and had a tile roller in stock. There were a few sections where the edges kept popping back up so we left the roller sitting on top of them for a while. There is still one corner that keeps popping back up but the rest of the floor is fine. Don’t let the size of the roller fool you. It’s heavy!

Installing New Baseboards

We weren’t planning on redoing the baseboards, but with all good projects, things change as you go. Our baseboards were 20 years old and in bad shape. A friend convinced me that baseboards are really easy so we went for it. I am so glad we did because they look great.

If you’re removing baseboards I would suggest scoring the top where the baseboard connects with the wall with a box cutter to break the bond. We didn’t do this at first and ripped off paint and dry wall in a couple cases. The paint was an easy fix but we had to buy some spackle to fix the dry wall.

We used a miter box to cut the baseboards.

Before we removed the baseboards, we made note using painters tape where the nails were so we would know where to nail the new ones. We then read that the nails are supposed to go into a stud so we used a stud finder and updated our tape markings. We started by nailing them into the stud area but later realized that the nail goes into the wall board and not the stud so we’re not sure if it really matters. In the end we stopped caring.

When we got to the cabinet baseboards, the nails would not go in. Like at all. I’m not sure what it is about the cabinets versus the wall but a normal hammer wasn’t cutting it. We ended up renting a nail gun from Home Depot and that solved the problem. Too bad we didn’t get the nail gun to start! The only issue with the rental nail gun is that it didn’t come with nails. We paid $50 to rent the gun and then spent $25 on a box of 1,000 nails (the smallest quantity sold in store) which we only used 30 of. If you need nail gun nails holler and I’ll send some your way.

The other surprise with the flooring is that we had to replace the threshold molding between our living room and kitchen. We should have known better but it was not in my original plan. Our wood floors are old so we had a hard time finding a color that matched the flooring. We found one that works but it’s just another unexpected expense. (We used weights to hold it down while the glue dried. DIY all the way.)

Knowing that painting the cabinets was next on the docket, we painted the cabinet baseboards before installing them. It made painting the cabinets so much easier! Painting the underneath was the worst part so not having to worry about the bottom edge was life saver.

Once the flooring was in and the baseboards installed, we used caulking to seal the edges. White caulking for the baseboard wall connection and clear caulking for the baseboard floor connection.

Budget

We spent $800 on the tile to fix the old flooring the the new tile. That was all we budgeted for. Naively we thought that’s all we would need. We ended up spending an extra $500 on unexpected items. Tool rentals, 970 nail gun nails we don’t need, floor scraper, heat gun, baseboards, over-reducer, caulking, ect. Had we expected these expenses ahead of time we could have borrowed tools from friends and shopped around for what we needed. Because we had a limited amount of time for this remodel (we were off work for a week) and our appliances were already in our living room, we opted for blowing the budget to save time.

So that’s it for the floor. Next up is painting the walls and cabinets! If you have questions about this type of flooring let me know.

DIY Kitchen Remodel: Removing Vinyl Sheet Flooring

By the title of the post I assume you figured out that we jumped on the quarantine kitchen remodel bandwagon. We are not DIYers. Actually, we’re not really home project people in general. Our kitchen has needed work for years but we’d rather spend our time and money camping, riding bikes, and exploring the country.

We had a vacation planned for the summer but decided to stay home instead. Partly because of the pandemic and partly because we got a quarantine puppy and realized leaving the pup with someone for 10 days wasn’t a good idea. (Puppies are a lot of work!) We had a week off work, money we weren’t spending on vacation, and a kitchen that needed a face lift. As all good projects, it started with painting the walls and morphed into new flooring; new baseboards; painting the ceiling, walls, and cabinets; and adding hardware to the cabinets. We thought the project would take a week but it took four. Rookie mistake. We were also planning to add a tile backsplash and lights under the counters but we need a break. Not sure if we’ll ever get to those.

Before

Our kitchen and pantry had 20 year old vinyl sheet flooring that was a mess. Over the years it ripped and we covered the holes with duct tape. Classy, I know. We finally decided to bite the bullet and install new flooring. We wanted tile but didn’t want to spend that much so we opted for luxury vinyl flooring. It is a floating floor and comes in planks that glue together. We opted for this option because it was something we could do ourselves and we didn’t need to purchase extra tools. (We have since learned that you can rent tools from Home Depot.)

We have no idea what we are doing and definitely did some things wrong. If you are here because you are wanting to learn how to remove old vinyl flooring, proceed at your own risk. 🙂

First step in the project was to fix the existing flooring. Because the new floor is floating it can be installed over existing vinyl. The only problem is that we needed to fix the holes to create a flat surface. Our original plan was to cut out the holes and install a new square. As such, we purchased a box of vinyl floor tiles. Turns out, vinyl sheet flooring is paper thin (or it’s worn down over the last 20 years) and the vinyl tiles were much thicker. This discovery happened around hour one and we quickly realized we were already in over our head.

At this point we decided we were going to pull up all of the old vinyl rather than patch the holes. (If you’ve done this you know already know it’s a nightmare.) We watched some videos and of course it looked so easy. I’m pretty sure those people had just laid the flooring they pulled up.

We couldn’t get the vinyl and glue to come up together. The top layer of the vinyl came off easily but the glue stuck to the concrete. In the end, we decided that pulling up the entire floor was going to take too long and neither of us have that much patience. Also, something was causing me to break out in a rash every time we started scraping the glue. Now that I think about it, I have an adhesive allergy so that makes sense. I’m definitely glad we didn’t finish the project.

Since we started pulling up the old flooring we had to finish that section. We left the bare concrete in the large section (I’m pretty sure we weren’t supposed to do that but don’t really care) and there is a small lip where the old flooring remains. We continued with our original plan and patched the holes with the vinyl tiles. There is more of a height different between the new tile and old tile than there is between the old tile and concrete. Our overall hope was that neither would be noticeable once the new flooring was down.

We did learn a few things along the way so if you are planning to pull up vinyl tiles or vinyl sheet flooring this is what we learned.

A heat gun and heavy duty floor scraper is your best bet. This was also confirmed by the nice salesman at Ace Hardware. He also suggested I get a bottle of wine for the task, so it’s clear he’s done this before. Some sections are harder than others to remove. We tried no heat, lots of heat, and found that gently warming the tile and scraping worked best. WARNING: DO NOT TURN THE HEAT GUN UP TO HIGH. I tried that thinking it would expedite the process. Nope. It only starts fires.

We didn’t actually get to the fire stage but on several occasions we did get smoking glue. Think of the heat gun as a hair dryer – if you hold it in one place too long it burns. Gently waive it around to heat up the glue and then use a floor scraper. Trust me – you want an actual floor scraper. We started using a hand scraper and it was taking forever. The process got better after we purchased this scraper. Having two people was also helpful. I was heating the floor while The Husband was scraping.

We ended up spending the entire first day prepping the floor for the new flooring. Most of the day was spent trying to get the glue off the concrete in that little section in the picture above. Once we figured out the right tools and method it went faster. There were also a few trips to Ace and several moments questioning what on earth we had gotten ourselves into.

Our must have products for this portion of the project were:

Have you tried to remove vinyl tile? How was your experience compared to mine? Had we decided to finish the floor I’m sure the rest would have gone faster. There’s definitely a learning curve. If you’re getting ready to tackle this project and have questions feel free to reach out.

Pop Up Review: Forest River Rockwood Extreme Sports Package 1910

We purchased a brand new pop up a year and a half ago so I figured it’s finally time I share our thoughts on it. The past 18 months have been So. Much. Fun! We have camped at least once a month, some times more, and have taken a couple longer trips – the longest being 11 days. Every time we go camping we state over and over how much we love this pop up.

We spend a lot of time off the beaten path and had been wanting something with higher ground clearance. When we learned that Forest River has an off road line with 12 extra inches of ground clearance, without the custom price tag, we were stoked! I look at all the different manufactures off road pop ups and the Forest River Extreme Sports Package models (or Flagstaff Sports Enthusiasts Package – they’re the same but under different names) have the best combination of features.

We purchased a 2018 Forest River Extreme Sports Package 1910 model. The size and layout is almost the same as our old pop up but all the extras are what sold us. It’s like your first car. It’s important to start with no AC or power steering so that later in life you appreciate the upgrades.

Our favorite features of this pop up are:

Most importantly, extra ground clearance! There isn’t anywhere we haven’t been able to take the new pop up. In fact, we had to put a lift on my 4Runner because we couldn’t see over the top of the pop up while towing, among other things. The picture below is prelift and you can tell it needed it.

The storage bin on the front is high on our list of favorite features. With our old pop up, all of our gear was stored in the pop up during travel. This made set up and take down a little longer because we had to get everything out every time. Now we just set the stabilizers and and worry about the extra stuff whenever we’re ready for it.

The dinette has extended cushions for a couch area and the table has an extension. With two teens, having more rooms around the table is huge.

The bunk ends came with overhead storage as did the kitchen. These are not deal breakers but all the little touches are what sold me on the this camper.

We have a heater and a fantastic fan! I know heaters in pop ups are not a new thing but we’ve never had one. I didn’t think a heater was necessary but boy was I wrong. We rarely run it all night, only on super cold nights, but we do use it right before bed to knock the chill out of the air. These options make it so we can camp more often because we can withstand lower and higher temperates, so they’re keepers.

The roof has cross bars that we can put our bikes on! We wanted to put cross bars on our old pop up but the roof couldn’t handle them.

The front bumper has a retractable cable lock which is really useful for locking up bikes or extra propane tanks. We don’t typically leave anything of value locked up outside while we’re away but at night or at a busy campground it’s nice to know our bikes are a little more secure.

The pop up came wired for solar. The solar ready RVs appear to largely be wired for one particular company whose panels are on the more expensive end. We purchased a less expensive panel from a different brand and had to change the connector, but other than that it works great. One more thing that allows us to be off the grid for longer.

The awning hooks into the side of the camper! Our old pop up had cords that tied to the ground and were tripping hazards, so this is a huge step up.

We have an outdoor shower and water heater. We only have these features because they were on the model we purchased but I’m growing fond of them. We used the water heater for the first time a couple months ago and it is really nice to wash your hands in warm water when it’s cold outside. We’ve used the hose to spray off muddy bikes and plan to use the shower this summer when camping off the grid for a bit.

It comes with LED lights under the awning which is nice at night. It’s not too bright but gives enough light to see the camper and light the door.

We have all the standard pop up features like propane tanks, fridge, sink, indoor stove, a few drawers as well as a couple other random features. It has an outdoor grill that ties into the camper propane. I think most pop ups have these but we do enjoy ours. We prefer to cook outside when camping. Our old pop up did not have trailer brakes but this one does. We appreciate having the extra support and find them useful when towing. A wifi booster is an option and the dealership we purchased from had already installed it on our camper. It is a wifi booster, not a mobile hot spot, so it only works at campgrounds with wifi.

What could be better:

This first one is actually a plus and minus. We have a power winch, so lifting the top is easy peasy. No more cranking until your arm is sore. The downside is the winch is SUPER loud. I feel bad when we are setting up or taking down early or late in the day, or are close to other campers, but I’m not going to stop camping over it. Forest River, if you’re reading this please figure out how to make the winch less obnoxious. My campground neighbors would greatly appreciate it as would my ears.

Some of the parts feel cheap. Within the first six months our hot water heater door blew off. The cover to our outdoor speaker has since fallen/rattled off, and recently the metal cover that goes over the stove burners cracked in the middle. This is an off-road pop up, so we take it off road, but it seems like the components aren’t necessarily built for that. So just check your stuff and tighten things with screws regularly, I guess.

Speaking of the stove cover issue. There isn’t much counter space in the 1910 floor plan, particularly when the whole family is camping and seating is at a premium, so I put my purse, drinks and whatever else doesn’t have a home during the day on top of the stove cover. The metal is very thin and has since cracked in the middle from the weight. Our old pop up had the same design, but the burner cover was very sturdy. We used it the same way and never never had an issue in the four years that we owned it. This cover broke probably around 12 months. It’s still usable for the time being but it’s disappointing that they used such thin metal.

The pop up comes with a bluetooth radio and indoor/outdoor speakers. We were really excited about these features at first, but haven’t used them much since. The problem is that the radio always plays on both the indoor and outdoor speakers and you can’t change that. After doing some research we learned that this is an issue with the newer models. The older models had a toggle switch but for some stupid reason they got rid of it. We have talked about rewiring the speakers but it’s currently easier to play from our phones directly or on a portable blue tooth speaker.

After 18 months and 18+ camping trips, the mattresses are starting to wear down. It’s a simple fix (purchase a mattress topper) and probably common for most pop up camper mattresses. The mattresses come with heaters which we have not used. They can only be used if you’re plugged into electricity and that’s not now we spend much time camping.

Overall we love the pop up and are so glad we made the purchase. It’s super capable, goes anywhere, and looks sweet. We get compliments all the time. People regularly stop to ask questions and some even ask to take pictures. I feel like we should be Forest River ambassadors. 🤣

The popularity of this line seems to be growing and we had a hard time finding ours. Our options were special order and wait four months or drive 13 hours to a neighboring state. We opted for the latter and drove to Texas. If you are in the market for a pop up and are looking for something to camp in while on outdoor adventures, check out the Forest River Extreme Sports Package pop ups.

Feel free to comment if you have any questions or share what features you love about your pop up!

Traveling With A Broken Foot Including Going to Disneyland

Well, the title says it all. I broke my foot earlier this year and it’s been a very slow recovery. I had a trip planned to Disneyland to watch Little Miss and her band play in California Adventure and had the unfortunate pleasure of traveling out of state with a broken foot. I was very nervous preparing for this trip. I can walk very short distances (in a walking boot) but am basically at the mercy of other people in my current state. It’s rather unnerving….at least for me.

Flying was easy once I figured it out and this is what I learned. Don’t be afraid to get a wheelchair. I’ve had a hard time with this…probably because I don’t want to admit that I can’t get around on my own. I want to just suck it up and make it all go away. Turns out the latter does not work. I requested a wheelchair when purchasing my ticket so the airline had one ready for me each time the plane landed. What I didn’t realize until after doing the airport the wrong way initially is that the stands outside the airport entrance are for passengers that need special assistance. Like me! You check in there…leave your bags there…and get a wheelchair there. It is so easy. And quick! We flew Southwest and someone in our party was able to push me around the airport. Not sure if that is the case with other airlines. We had a run-in with a Delta employee who thought we stole a Southwest wheelchair and where going to do who knows what with it. He didn’t believe us that Southwest would allow a non employee to push the wheelchair. It’s funny now but at the time not so much. You can also have an attendant push you but there always seemed to be a shortage of attendants so I was happy to have my own pusher.

Going through the security line was fine once I had the wheelchair because I didn’t have to stand. I did have to walk through the body scanner but I was able to keep my boot on. At the gate I was able to pre-board due to a medical issue, so that’s a plus. I eventually had to let go of whatever feelings were bothering me and own the wheelchair life. It really made my trip so much better.

The next big hurdle was getting around town. Instead of renting a car we used Lyft and Uber so we didn’t have to deal with parking and walking and such. On a couple of occasions the driver wanted to drop us farther than we wanted so I played up the broken foot card and was able to get a closer drop off every time. Don’t be afraid to use your injury to your advantage if needed. 😉

And now what you’ve all been waiting for…visiting Disneyland with a broken foot. Almost every time I told someone I was going to Disneyland with a broken foot they responded with, “at least you won’t have to wait in line.” Let’s clear up that thought because it’s incorrect. That used to the case back in the day but apparently too many people took advantage of the situation (by faking injuries or “renting” the use of an injured person) so Disney had to change the rules. Here’s what I learned after spending time in Disneyland.

First up, you can rent a manual wheelchair or a motorized wheelchair called an electronic conveyance vehicle (ECV) to assist in getting around the parks. I spent the extra $38 for the ECV and am so thankful. There are actually a lot of hills in Disneyland and the poor soul pushing you will have to endure that torture if you’re in a manual wheelchair. The ECV was $50 for the day where a regular wheelchair was $12. The wheelchair/ECV can go anywhere within security, including Downtown Disney, but you first have to get through security. We arrived around the time the park opened and there were literally hundreds of people in the security line. I was in a walking boot but there was no way I could stand for the 30 – 60 minutes it would take to get through that line. We learned, after asking several employees, that there is a no bag line. I left my purse with my party and took my debit card and ID and headed for the no bag line. I was through quickly and headed to the wheelchair/stroller rental store. Renting an ECV was easy and took only a few minutes. And then I waited for everyone to get through security.

My Disneyland ride

Getting around Disneyland in the ECV was fine except that you are constantly dodging people that think you can stop quickly. Word of advise to anyone walking in front of an ECV – they don’t have brakes and it takes a couple seconds to stop. Another word of advise: don’t take an ECV in an elevator. They don’t really fit, there’s no room to turn around and the backup beep is crazy loud in the confines of the elevator. If your injury allows, park the ECV downstairs and take the elevator up in your boot. We learned this the hard way. I didn’t think twice about pulling into an elevator as soon as the door opened. It wasn’t until the door closed that I realized we had to figure out how to get it out. Everyone watching thought it was rather comical though.

Until now all references to Disneyland refer to both Disneyland and California Adventure. There are a couple difference between the two parks when it comes to rides. California Adventure is better equipped to handle wheelchairs/ECVs as all of their lines were made to accommodate the chairs. So, when in California Adventure you get no special treatment. Just get in line with your friends. Disneyland is a different story because the lines were not built to accommodate wheelchairs. In Disneyland you enter the ride through the exit but during busy times you will have to wait. I didn’t ride many rides because it really wasn’t enjoyable. You still have to get yourself into the ride, which often requires getting down into something and then getting back out of said car/log/train/boat/ect, but your foot is also flung around on the ride. Not the best if your injury is still painful.

All of the Disney employees were incredibly helpful and went out of their way to make sure I was able to enjoy my visit as much as possible. I wouldn’t recommend going with an injury but if you already have a trip planned it’s possible to still have a good time.

For more information on services for Disneyland guest with disabilities visit their website.

Lastly, I want to send a huge shoutout to my Disneyland adventure buddy. This trip would not have been possible without you. Thanks for all the wheelchair pushes and for getting me unstuck in the elevator. 🙂

After Vacation Update to Dehydrated Food and the YETI

I should probably get around to updating from our last vacation before our next vacation. I currently need to finish our taxes, get caught up on some treasurer duties for an organization I belong to, and I’m a little behind in work. What better time to get caught up on blogging than when I have a list of things I don’t want to deal with! Read more

Dehydrated Spaghetti Sauce

I’ve been preparing for summer vacation lately and trying to get our food situation set up. I recently tested out dehydrated ground beef and it was a success. If you would like to read that post click here. I use a dehydrator but you can also use your oven if you don’t have a dehydrator. Read more

Ladies All Ride – A Must Do For Mountain Biking Ladies!

I attended the Ladies All Ride clinic in Sedona, Arizona in early April and had the most amazing time. Technically, it would have been even more amazing if I was not dealing with a foot injury but I still had a good time. It’s taken me some time to put into words what I got out of the weekend but I will do my best. There is something incredibly powerful about stepping outside your comfort zone and learning new things. Do that in a group setting and the result is pretty spectacular. I spent two days with a group of women learning new skills, stepping outside our comfort zones, and trying (and conquering) what we previously thought was impossible. Read more